Add a Discount Message to an Invoice
Date: Apr. 14, 2020 Categories: billing , Billing Matters
If you need to apply a discount to an invoice, Billing Matters gives you flexibility:
-
A discount may apply to just to one invoice or to multiple future invoices.
-
The reduction may be a flat amount or a percentage.
-
A discount may apply to an entire invoice or to one or more items on the invoice.
-
Discounts may be shown next to each discounted item or as a single discount - a credit - at the bottom.
-
A discount message may be shown on the invoice to explain the reason or just the fact of the discount.
How to Add a Discount Message
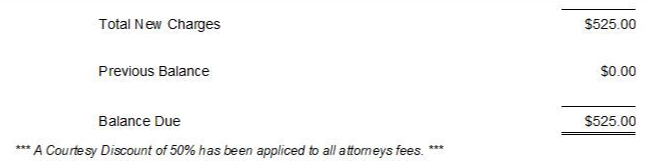
This post covers the settings for adding a discount message to an invoice using a Custom Message. The message can look like this near the bottom of the invoice:
To add a discount message at the bottom of an invoice:
-
Open the Matter record.
-
Go to Matter Form Menu / Edit / Billing Preferences.
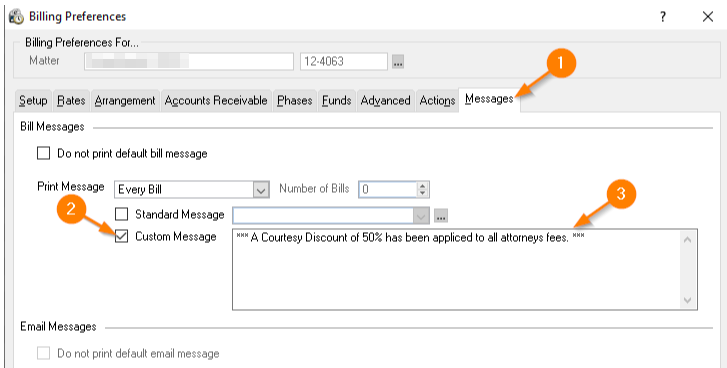
In the Billing Preferences window:
-
Click Messages.
-
Check the Custom Message checkbox.
-
Enter the text of your Discount Message. Formatting is not available, but three asterisks before and after the text tends to emphasize the message.
In this example, the message will apply to Every Bill, but you may select Number of Bills and choose a number.
Location of the Discount Message on Invoice
The location of the Message on the Invoice is determined by the Billing Profile. One setting applies to your Default Message that appears on every bill. Another applies to the Custom Messages that you may add to individual Matters.
To set the location of a Custom Message:
-
Go to Time Matters Main Menu / Setup / Billing Options / Billing Profiles
-
Open the Billing Profile record used for all your Invoices or customize another Billing Profile record.
-
Click on Print Order.
-
Find the Custom Message and click on it.
-
Move the Custom Message down until it appears just before the Default Message or, optionally, move it to a different location such as the top of the Invoice just above Time Charges.
Questions? Contact us at 800.575.0007 or send us an email…